Make & Sell Sample Packs Part 2: Creating Sounds


This is part 2 of a 3-part guide to making and selling sample packs created by Harry Jackson from Whipped Cream Sounds.
Before you can create a sample kit, you need to plan how to organise your sample library. If you haven't done this yet, head to part one of this three-part guide, then come back here when you're ready to move on to making the actual sounds.
The plugin that I'd recommend for making production sample packs is Serum — it’s widely used across the industry and it's extremely versatile.
I'll be demonstrating how to use Serum to create music sample packs in the guide below.
How To Create Drum Sounds for Sample Packs
Drums are the bread and butter of most sound kits, the three most important steps to create unique, interesting drum sounds are:
- Synthesize
- Layer foley and add processing
- Find transient, body and tails of different sample snares and layer those together
Synthesizing Drums
We’re going to be using Serum for this process. To get the best results in Serum you’ll want to understand the noise oscillator and import some foley samples in there for extra texture.
You want this foley pack to include short transient sounds otherwise it won’t work very well. You may want to find a pack like this online, or slice up current packs you have, making sure to create sub-1-second cuts.
When designing drums, everything can be made out of a sine wave, some noise, enveloping and clever LFOs.
Kick Drums
For a Kick drum you need 1 sine wave, and a short pitch envelope that will rise to create the click, then come back down to add the bass. You can then also add things like short cardboard box sounds or kick transients in the noise oscillator to layer this and make it sound even better.
Envelopes are attached to the coarse pitch of the oscillator to create a click transient for the beater of a Kick. Play around with the settings from +12 - +24 to see which you like the sound of best. Each will produce a different tone so one is not better than the other. Also change the octaves of the wavetables here to give a lower or a higher sound — depending on the style of Kick you want.

- As you can see the kick has a very short transient a decent, long thumpy body and a very short tail. This is the common transient profile of a kick, but you can of course get different ones. To create it you need a short snappy click, some mid-range body and a low-end thump/rumble.
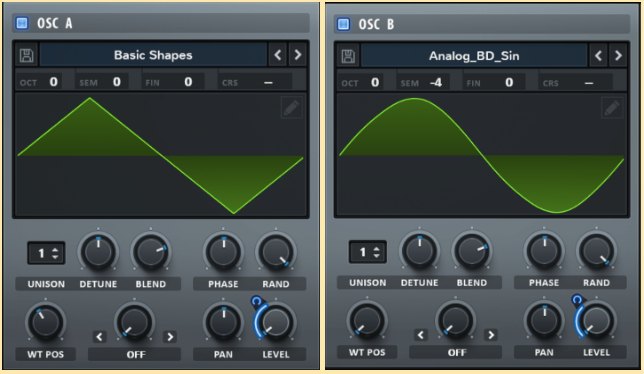
How To Make The Base Layer Of A Kick Drum In Serum
Here are the basic settings in Serum I use to make the base layer of a Kick drum:
-
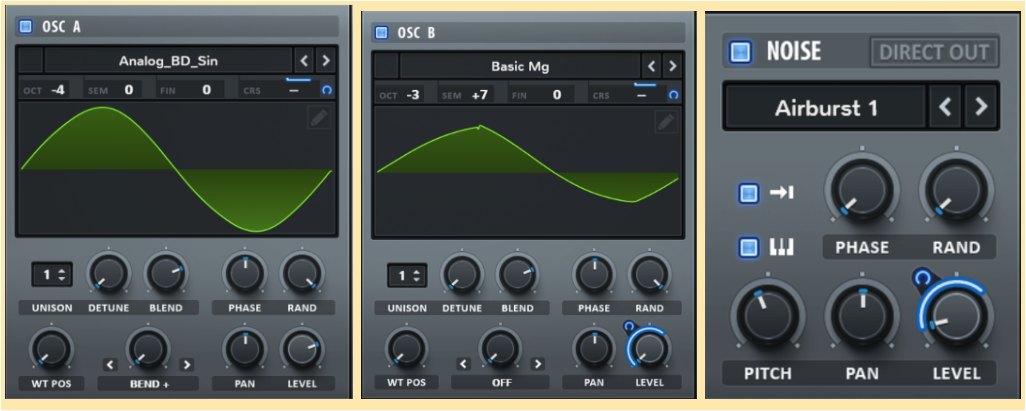
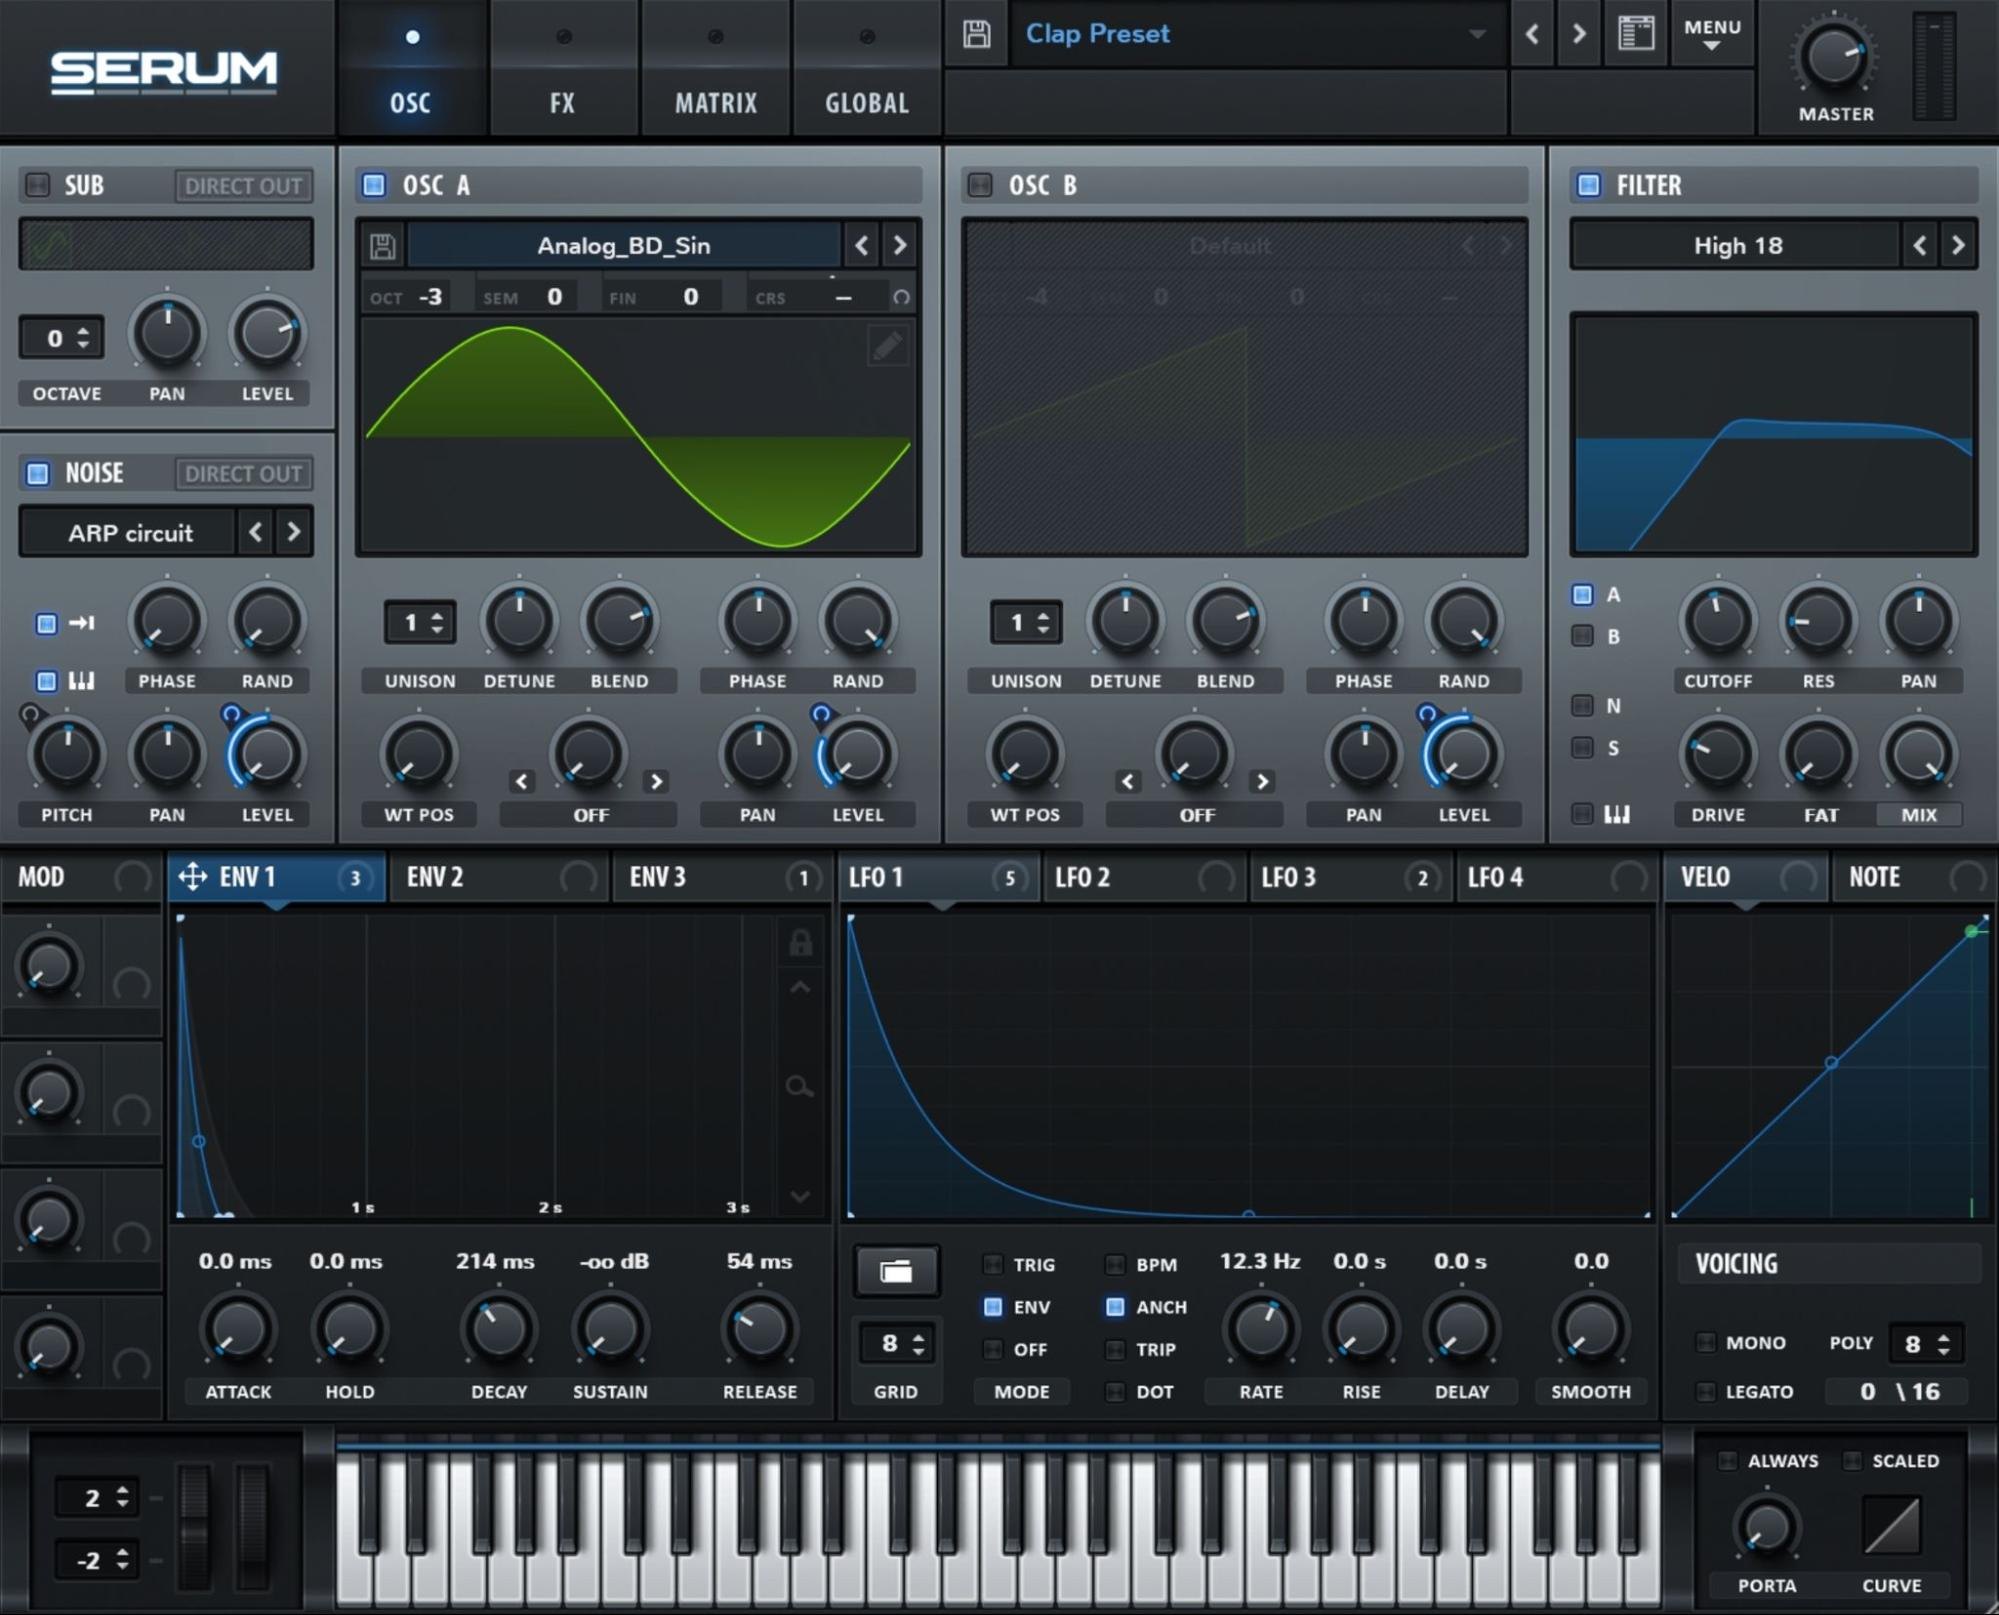
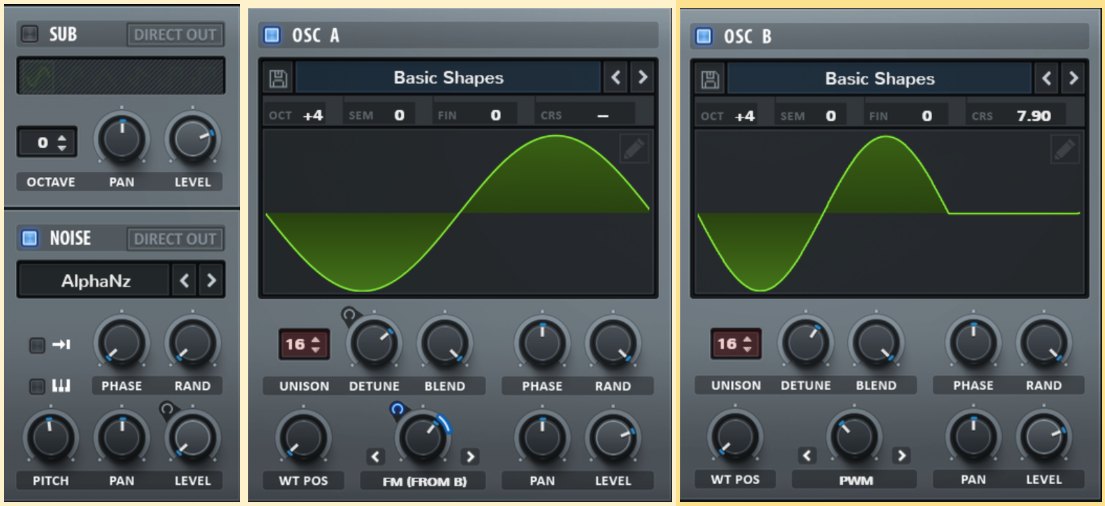
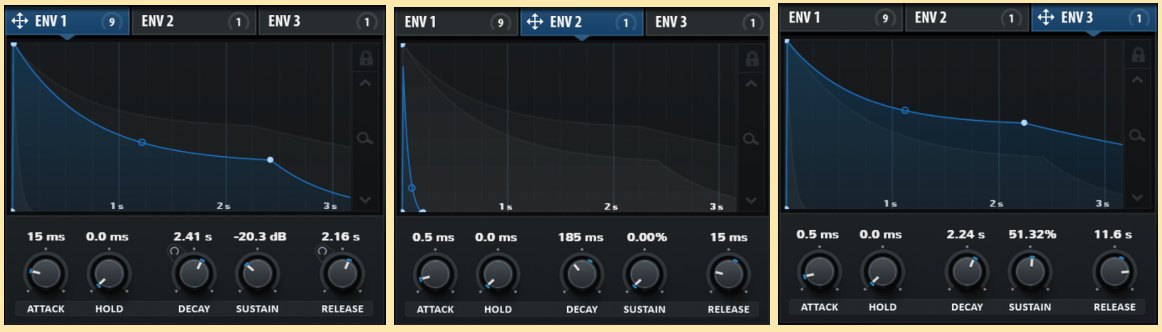
Oscillator a is a sine wave. This provides the bass for the kick. The coarse pitch is attached to envelope 2 (going up +12st - +24st) to cause a sharp rise in pitch, then a quick drop. This gives the high-end click of the kick, quickly dropping down to provide the subby bass thump. We have -4 on the octave to create a really low end kick layer.
-
Oscillator b can be added to oscillator a (if you want) to add tone to the kick. The +7 semitones give it a harmonic that makes the kick drum sound a bit more tonal. The level and the coarse pitch is attached to envelope 1. This prevents the triangle wave from being in the sound too long and causing it to muddy up or distort the sound. The coarse pitch is again used for the shape and sound of the kick — giving it the click characteristic as well as the sub.
-
The noise oscillator is used for texture. You can use foley sounds or kick drum transients to add a natural element to your kick. This is controlled by envelope 3 which is a much sharper, quicker shape (see below).
-
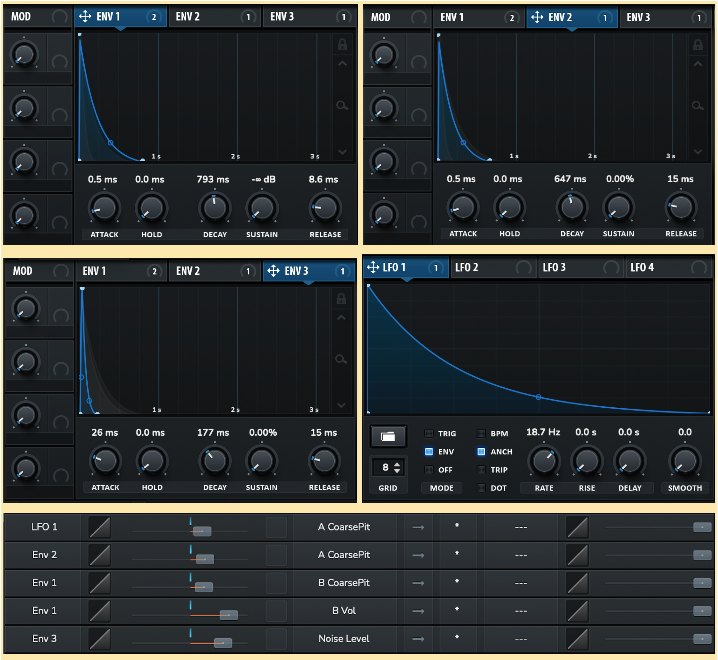
Envelope 1 controls the coarse pitch and level of oscillator b. It has a slight different release time to allow the tone of the triangle wave to come through, but not overpower the sound.
-
Envelope 2 is attached to oscillator a's coarse pitch. this shape provides the sharp rise in pitch to give the click of the kick and then sharply descends to give the bass thump.
-
Envelope 3 is attached to the level of the noise oscillator. Adding noise to the kick can give it more texture. You can add kick transients or foley sounds to give it a more natural feel. The noise oscillator doesn't have to be used in this patch.
-
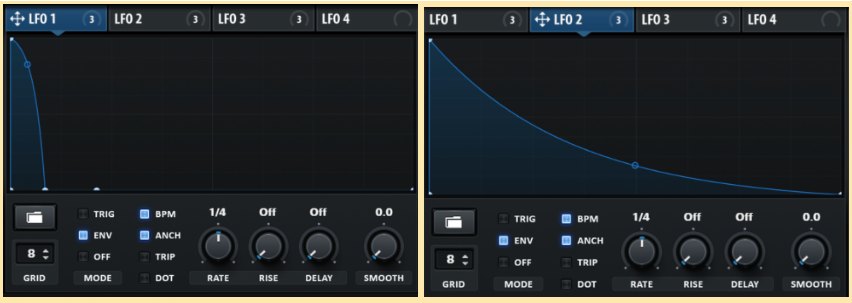
LFO1 is attached to the coarse pitch of oscillator a. This gives the kick more of the click tone to cut through a mix and sound like a kick. This was used with a +12st boost to the coarse pitch.
-
This is the mod matrix to show you visually what everything is connected to. Take a look at the shapes and imagine how they would alter the sound. Apply it to your own patch and you'll really begin to learn how this is put together.
Snares
Snares follow the exact same process as above, but with a different base layer in Serum. You are also going to use a sine wave to create snares, but you’ll utilise the noise oscillator and some clever enveloping to create the tail of the snare. It’s a little more complex, so bear with me.
The body of the snare comes from the sine wave (the weight) and the crack comes from white noise or other sources of noise. You can also use a saw wave or other waves like triangles to give the snare a more tonal sound.
I also personally love to create the base layer in Serum and then use RC-20’s follow feature to add some lofi analog noise on top and create an even crunchier, textured snare.

How To Make The Base Layer Of A Snare In Serum
Here are the basic settings in Serum I use to make the base layer of a Snare drum:
-
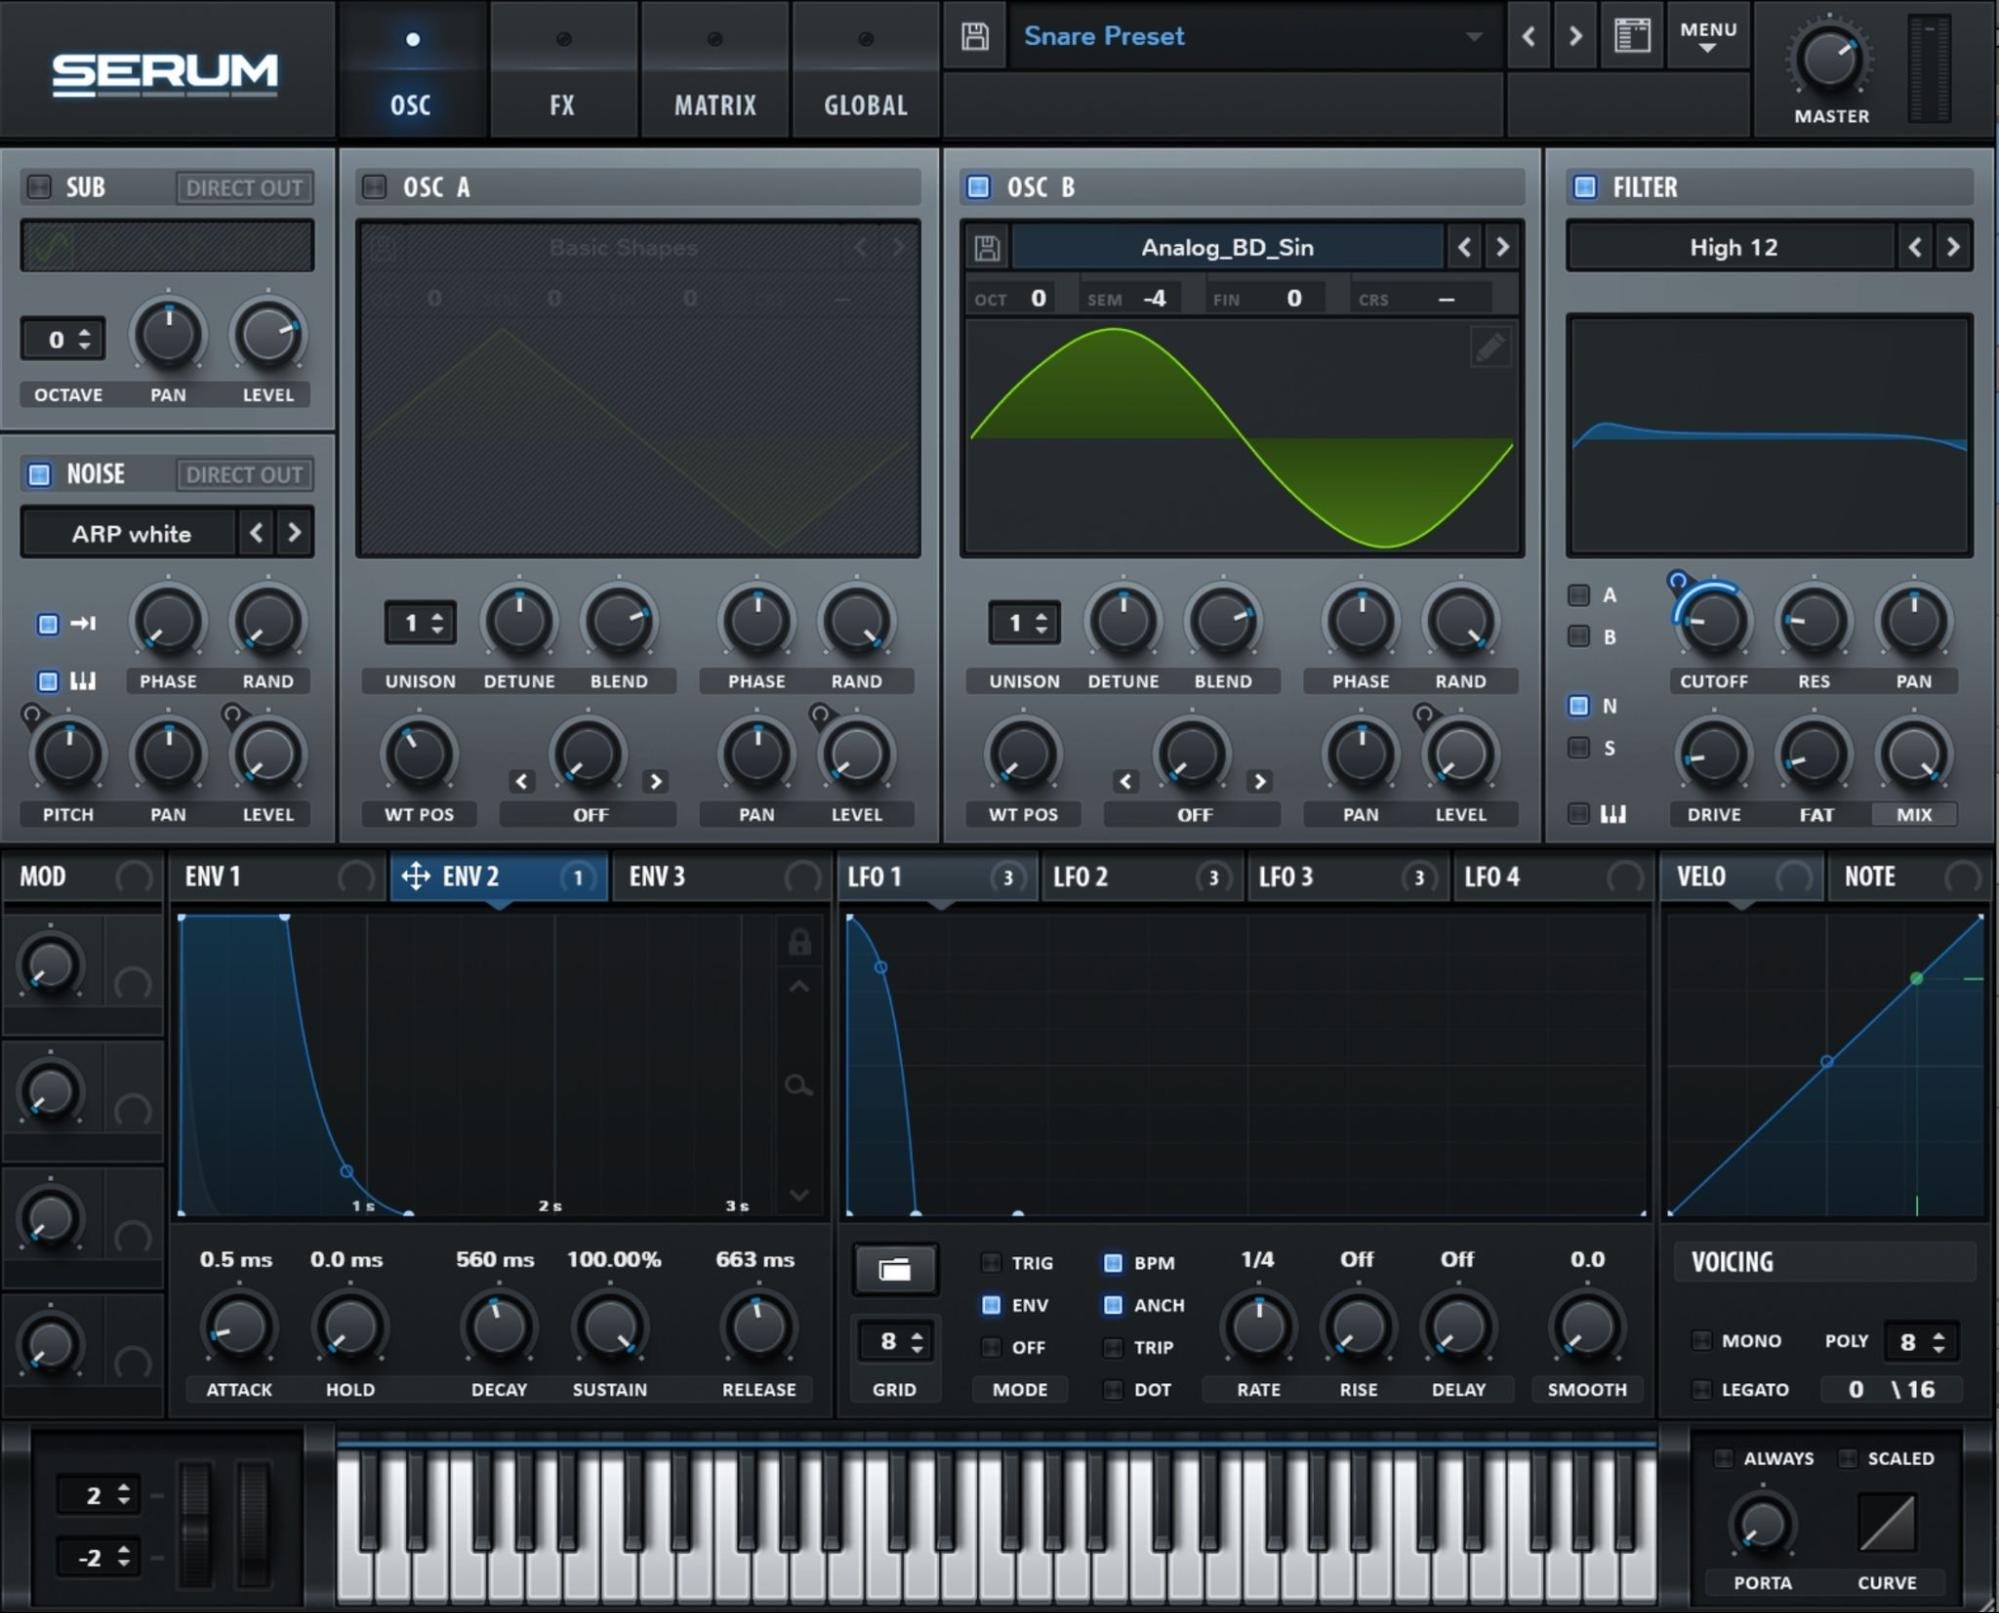
oscillator a is a saw wave. You can use saw waves for more tonal, mid to high range snares. These sound somewhat metallic. The level is assigned to LFO 1 which gives the snare it's envelope shape. Check LFO 1 for settings.
-
oscillator b is a sine wave. The sine wave sound is for more weighted, body snares. The level is attached to LFO 3, which is used as a trigger envelope to mimic the shape of a snare. Check LFO 3 picture to see shape.
-
LFO 1 is attached to the level of both oscillators. It is also attached to the low-frequency band of the EQ effect in the effects tab. This allows the low end to come through momentarily for the body of the snare, then cut out for the crack /fizz of the snare to come through without the sine wave overpowering everything. This is set up as an envelope instead of an LFO so that it reacts with every key press and shapes the snare sound, rather than modulates it.
-
LFO 2 is attached to the low-frequency & high-frequency gain, as well as the high-frequency band of the EQ effect. It is set to act as an envelope to shape the sound and is responsible for the tail of the snare. If you look at the shape, the initial gain is on full, allowing for the smack of the snare in both the low-end and high-end ranges (since it is attached to control both of those gain settings) - this is what gives it, its transient shape. It then reduces over time to provide the tail shape of the snare, and also to prevent distortion and gain overloading. As for the high-frequency EQ control, this starts at 400-500Hz to bring out the mid-range of the snare, then moves up to add the high-end crack.

-
As you can see the EQ low frequency modulation goes down to allow the low end to come through momentarily then cut off. This stops muddy, overpowering frequencies and gives the snare weight, without destroying the shape.
-
As you can see the LFO 2 attachment to the low gain, high gain and high-frequency band control gives the snare its transient shape and tail shape. This allows for the quick smack, crack and then fade out.
-
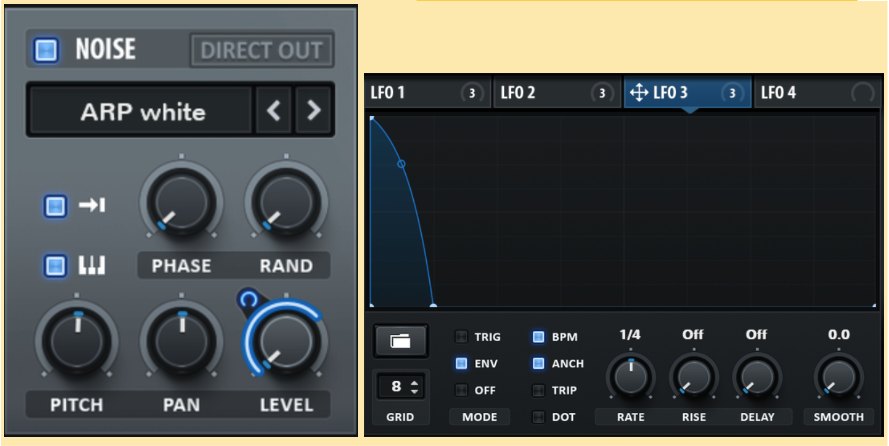
The noise oscillators uses a white noise sound as the base to create the crack/fizz of the snare. You can change this to foley if you like. I encourage you to play around with the settings — it's how you'll get unique sounds! The level is connected to LFO3 (pictured right). This is a very similar shape to LFO 1. However, I chose to separate them to really dial in the crack sound of the snare. Both are set up in envelope mode so they act as envelope shapers, rather than LFOs.
-
LFO 3 controls the level of the noise oscillator and adds drive to the snare in the effects tab. It is set to envelope (instead of LFO) to shape the sound like a snare. This provides the short crack of the white noise and then adds a little distortion to add some crunch and pop to the snare. You can alter the shape to add a longer tail of white noise or make it even shorter.
Claps
Claps are also created using a sine wave and some white noise. The clap is interesting because you have to simulate the flutter echo effect you get from a clap in the real world, using an LFO volume modulator.
They can be made in Serum pretty easily, and we’ll cover how you can make a clap sound below! To make good claps I personally prefer layering foley with the Serum base layer. They sound more natural and real. You can only go so far with Serum for this.

How To Make The Base Layer Of A Clap In Serum
Here are the basic settings in Serum I use to make the base layer of a Clap:
- The clap almost has 3 transients before the tail as you can see. This is what gives the clap its signature, flutter echo style sound. The tail is then comprised of white noise to add the crack/fizz.
Hats & Cymbals
Hats and Cymbals are very similar in my opinion. They use comb filtering to create the metallic sound, using a sine wave, with FM modulation and some other clever modulation tricks. Creating Cymbals and Hats for sample packs is the hardest sound to master and there’s a lot that goes into creating a Cymbal sound.
The best way to go about creating them is to first design the base layer in Serum, resample it, then use frequency shifting to alter the tone, layer it with other processed foley, and then play around with a transient shaper like Smack Attack to shape the sound further.
For cymbals you want a crash and then a huge tail; for closed hats, you want a short metallic sound; and for open hats, you want a kind of resonant mid-length sound.
You need to keep this in mind when layering foley and mixing it in.
What is going to be your long tail noise layer? What’s going to be the transient? How are you going to create the metallic rattle inbetween?
All of this can be synthesized and it sounds relatively realistic. But, there will always be some electronic feel if you don’t layer the patch with real world sounds.
You can also make use of Serum FX if you don’t want to have the base layer coming from Serum, but rather, you’d like to use a sample base layer and apply the same processing to it.
Let’s go through how to make the base layer in Serum. After you understand that, you can use any metallic crash, white noise or foley sound to layer through Serum FX and create fantastic-sounding Hats & Cymbals.
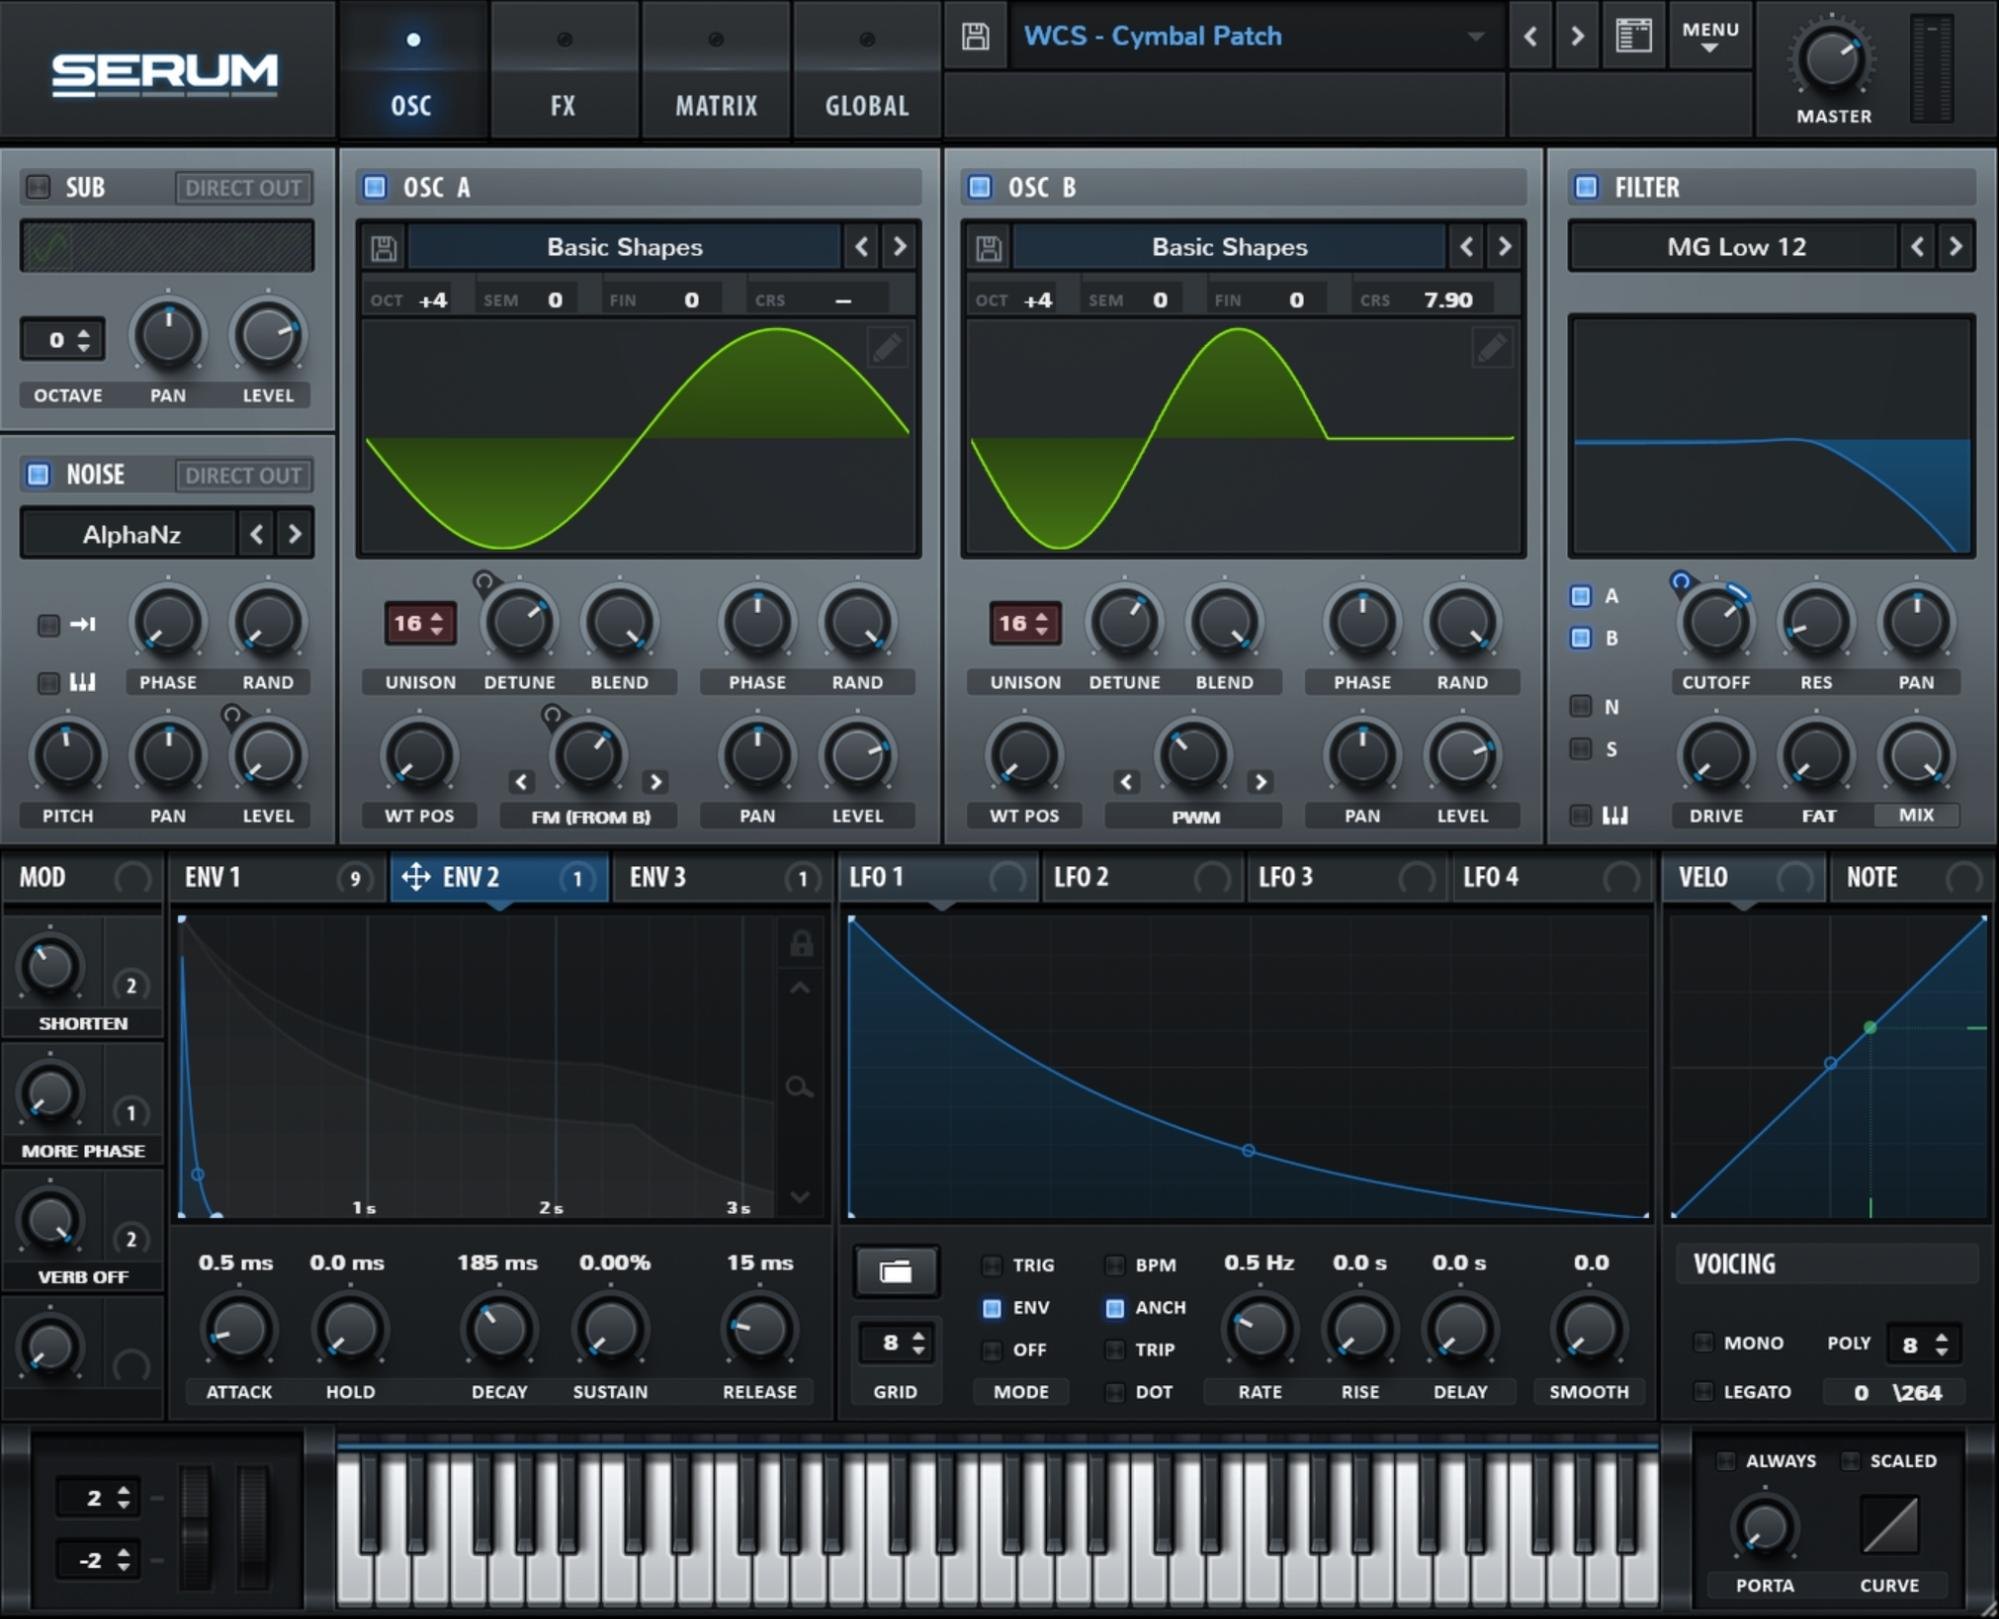
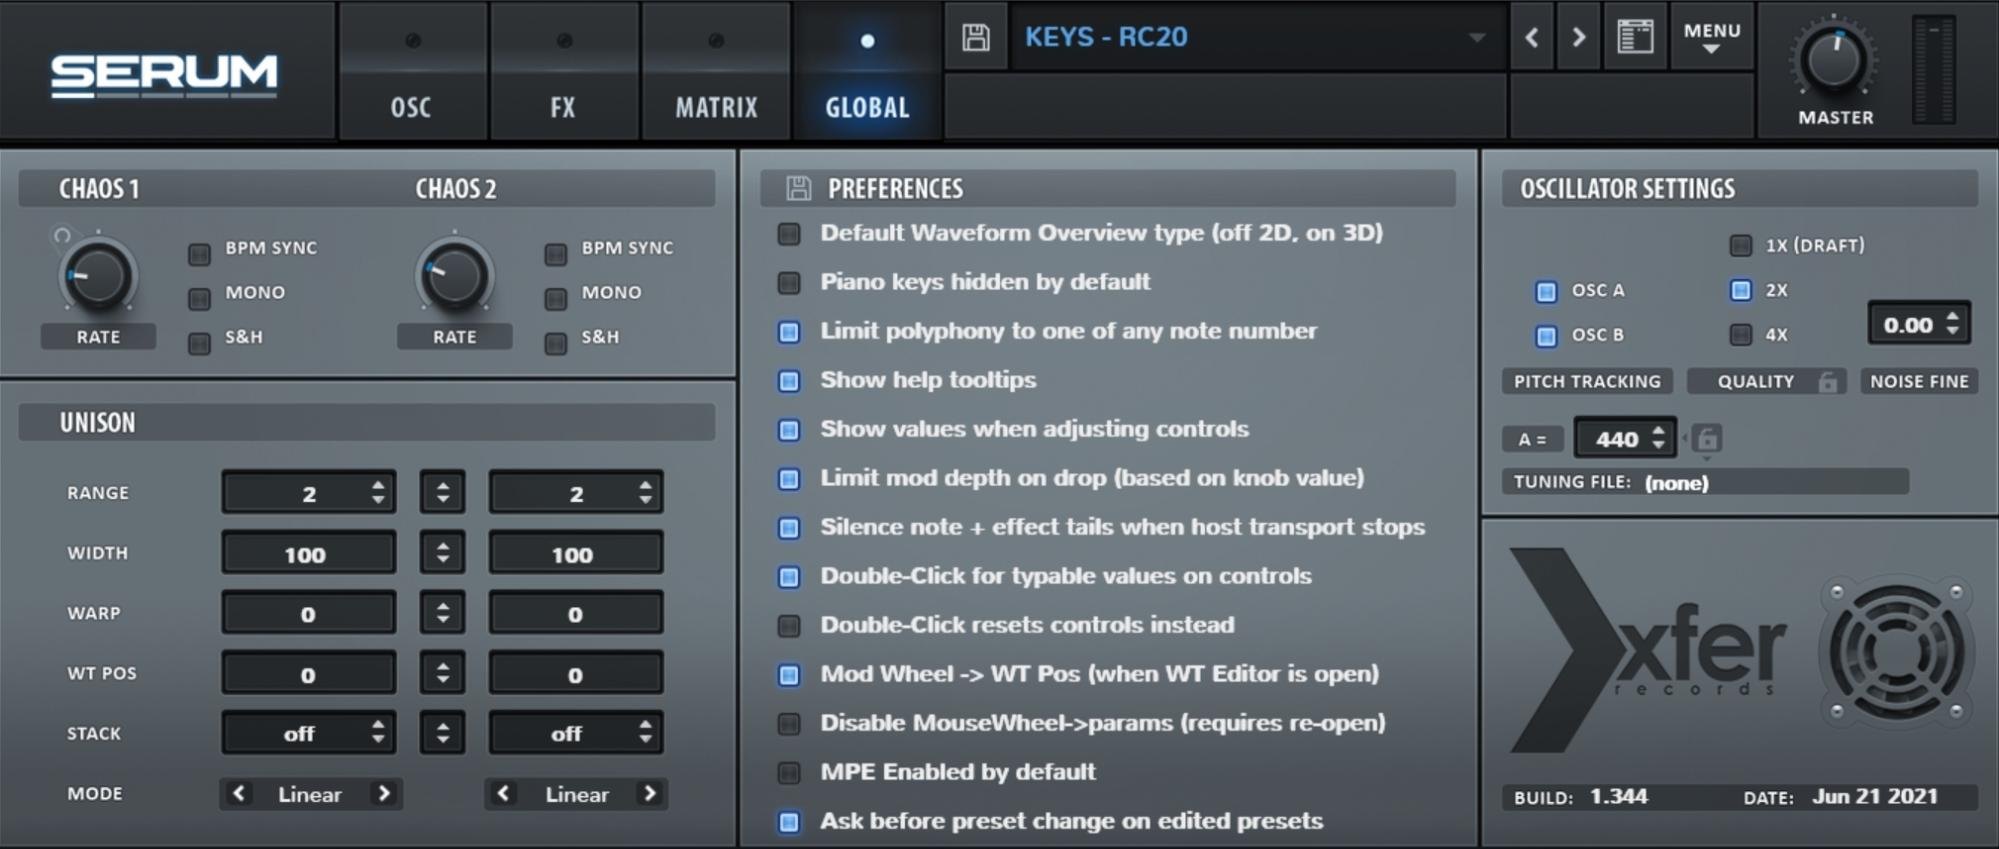
- First, head to the global tab and make sure to uncheck "OSC A" & "OSC B" on the oscillator pitch tracking settings (seen top right corner). This will keep your cymbal at the same pitch, no matter the note you press. This is important, because we'll be using the coarse pitch and octave sliders on the oscillators to create the tone and pitch of the sound. Also, make sure to set the unison range to 48 on both sides (seen left of the image, just above "width"). This creates a larger detune range in the unison detune we will apply to the oscillators, and creates a metallic sound bed for you to build your Cymbal sound from.
- Oscillator B is a sine wave. It has 16 voices like A, because this will help create the metallic sound. The octave is +4 because we will turn off pitch tracking in the "global" tab. The coarse pitch is at +7.9 in this instance, but this can be played around with to change the pitch of your Cymbal and create different metallic tones for your final sound. The PWM modulation is used to shorten the wave and create a more metallic sound too. Detune amount, PWM and coarse pitch are all very important components that need to be played around with to get the right sound you want. They all drastically alter the pitch, tone and depth of the sound.
-
Envelope 1 is the key shape of the sound. Cymbals are usually quite splashy, so you want to replicate that. A short attack gives us the transient, the decay gives a mid-level body and the release provides that tail. This envelope is used to control a lot of modulation effects which help shape the cymbal sound. Envelope 1 is attached to the FM from B, the main filter cutoff, the FX filter resonance, and mix control, the distortion filter, EQ controls and reverb. We will cover those in depth on the FX images.
-
Envelope 2 is used to dampen the attack of the Cymbal a little bit. Because envelope 1 opens the cutoff of the filter quite quickly, this short envelope is used to close the filter rapidly so it has less of a impact. This gives the cymbal a more authentic sound. You only want to close the cutoff of the filter a very small amount using this envelope.
-
Envelope 3 is used to control the noise oscillator. As you can see the release is much longer because the noise provides that long crash-like tail. This is only attached to the level of the noise oscillator.
-
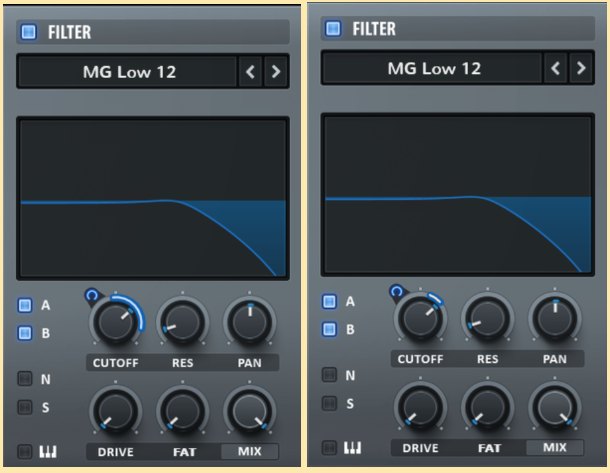
For the main filter you can use MG Low 6 or 12. I have chosen Low 12 for this instance because it sounded better. You want to ensure that oscillator A&B are going through the filter. You will then use envelope 1 and 2 to control the cutoff of the filter in different ways. Envelope 1 will be applied to the filter and used in the "bi-polar" setting. This provides a quick sweep through the filter and allows the high end to come through momentarily, giving that crash/hiss sound. It also helps to create a more metallic sweep that sounds more cymbal-like.
-
For envelope 2, you'll use it to quickly dampen the attack of the cymbal, preventing a nasty high end crash that will hurt your ears. It gives the cymbal more of a balanced tone, making it sound more realistic. You will use envelope 2 to close the filter as show in the image. Don't use it too much and make sure you play around with the cutoff on the main filter, the envelope 1 modulation cutoff and envelope 2's modulation cutoff. Trial and error will give you the best sound.
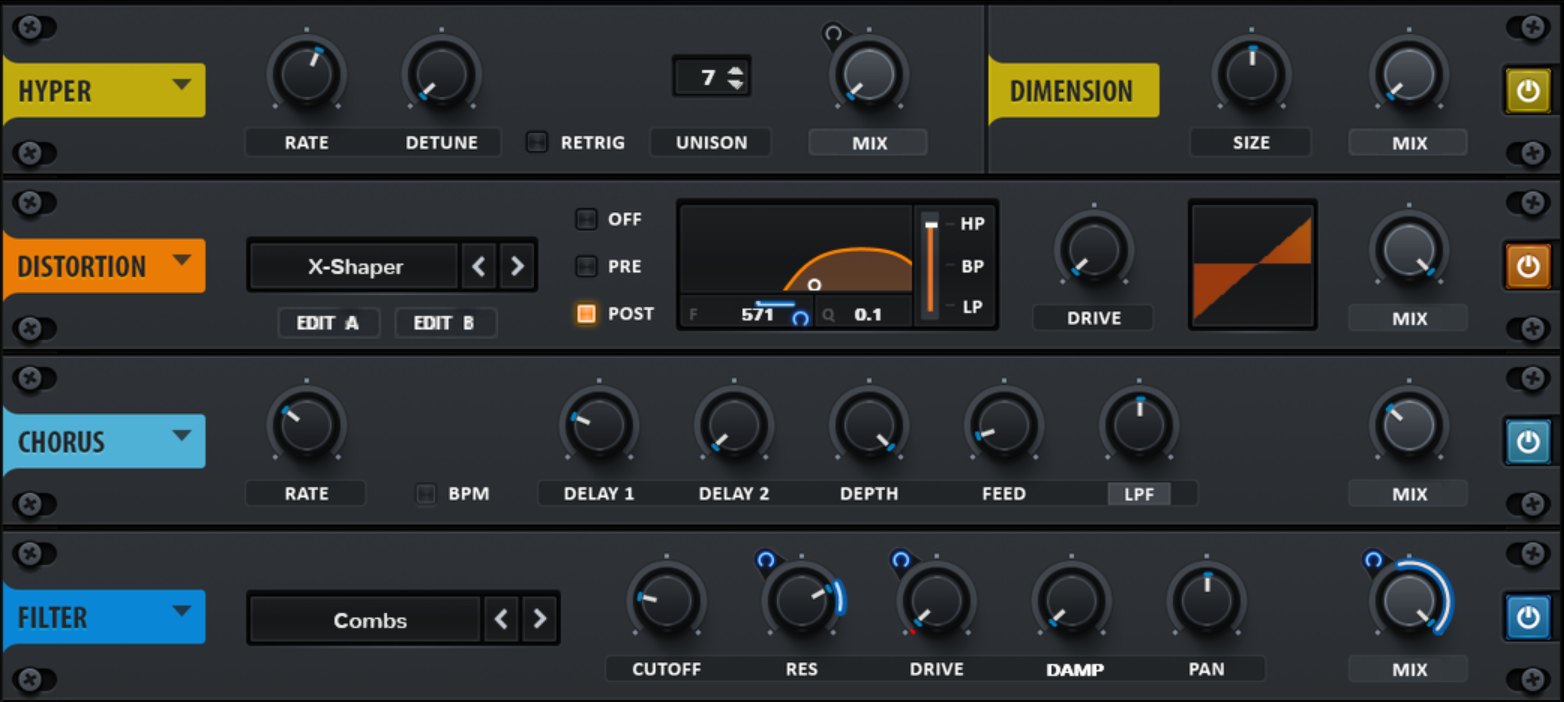
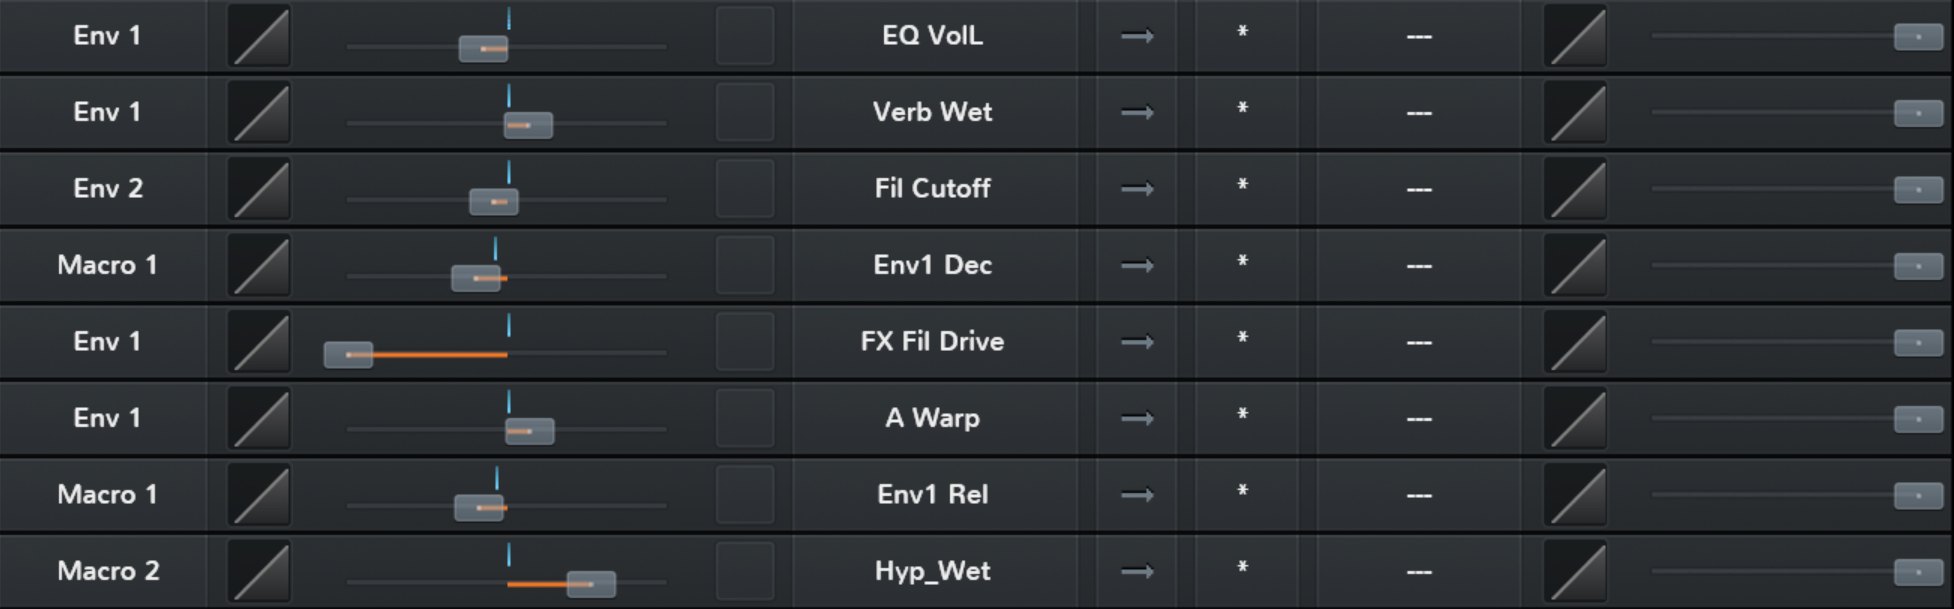
Here is the full list of FX you'll want on your sound.
-
Hyper adds more unison and phasing if you want it to. Make sure the detune is all the way down and play around with the number of voices and rate to change the effect. The mix knob is also assigned to macro 2 so you can turn it off and on easily.
-
Distortion, I've gone over above (it's used as a high-pass filter).
-
Chorus is used to add yet more phasing and metallic sounds. Play with the rate and the delay 1 settings. Make sure delay 2 is all the way down and don't put the mix on full. Blend this in to give the sound more texture. It's not too noticeable so you'll have to really listen for it, but it does make a difference.
-
The Filter is the most important part of the sound. You want to make sure you use the comb filter. This will make the Cymbal sound even more phase-y and metallic, giving a more natural crash sound. The cutoff and resonance need to be played around with between sample creations because they affect the texture, tone and style drastically. Envelope 1 is applied to the resonance and the mix. This gives it an extra bite on the attack and also prevents the comb filtering from being too over-bearing.
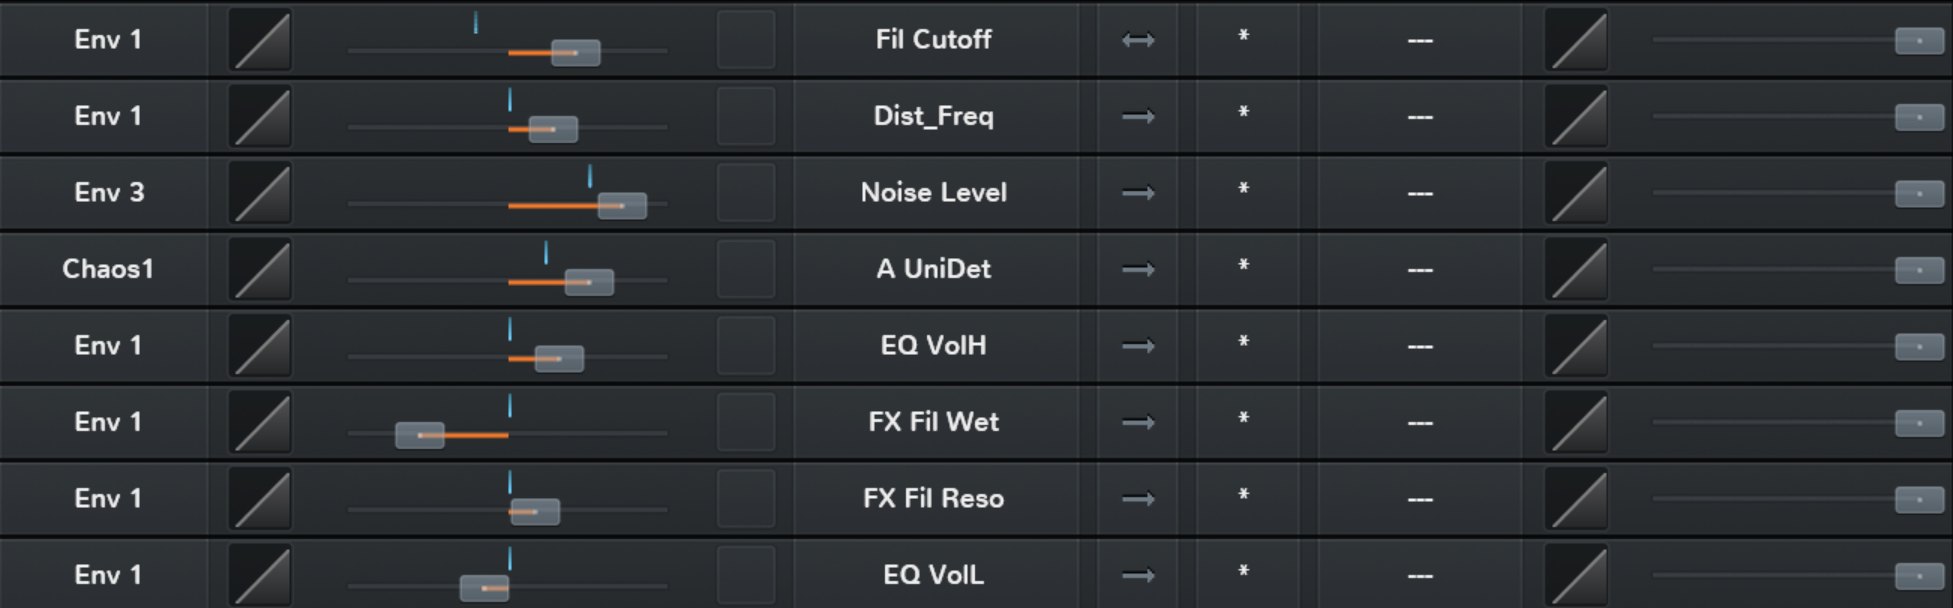

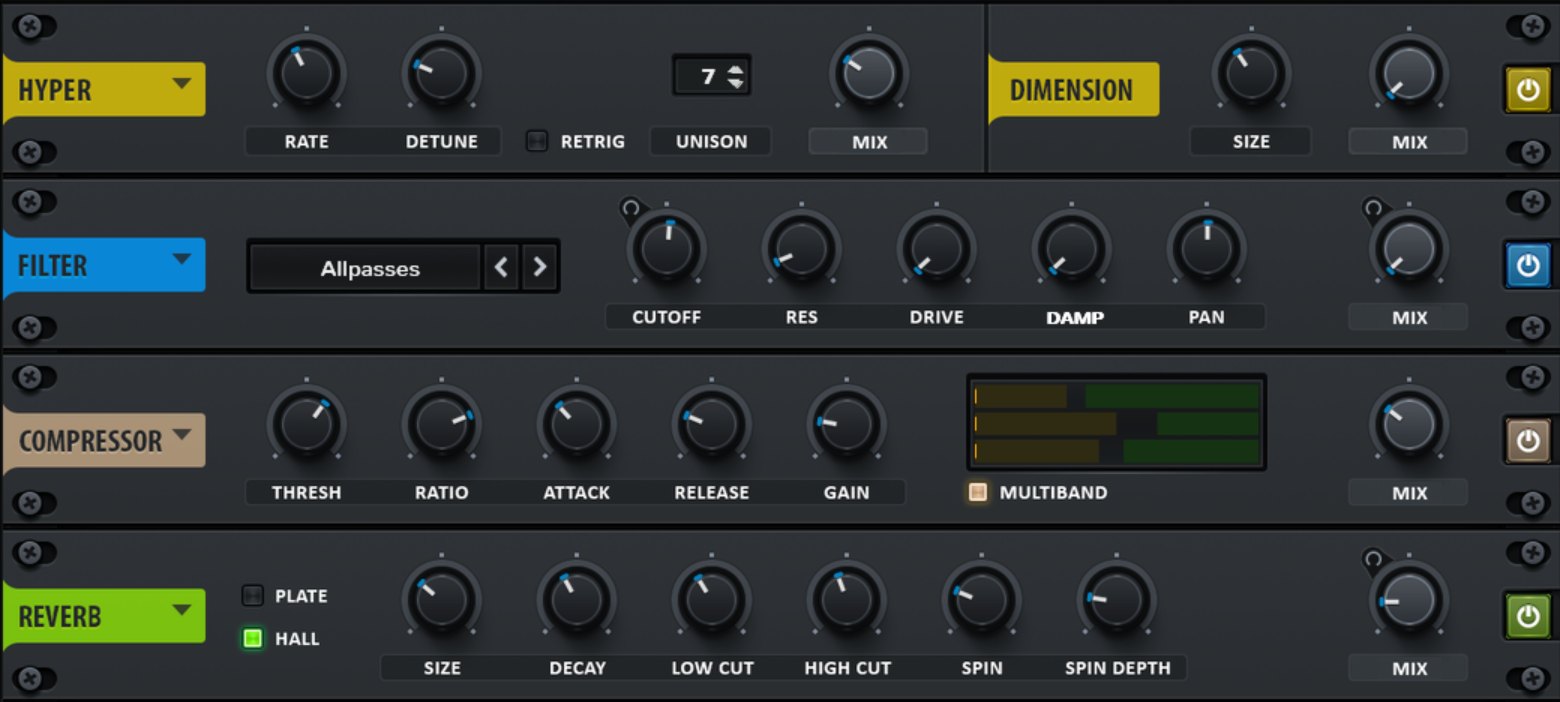
Above is the mod matrix so you can see exactly what each setting is being used for. An extra special tip is to play around with the “curve” setting on the envelopes modulating the cutoff of filters.
In the picture above, you can see the lines ramping up. These can be clicked and shaped to a more curved shape, giving the effect more of an attack.
Processing
To improve the sound of your drum design and make it more professional, you’re going to want to add additional processing and layering.
Layering
You can layer any of the Serum layers above, with a bunch of other foley sounds, creating different fades and tails. For different sounds, you’ll want to use different foley sources.
Think of layering for drums like this:
- Transient — the clicky start to the sound. What does the sound’s transient you’re making sound like? Try to find a transient that will match a Kick or Snare or Hat
- Body — The meat of the sound. This is the thump of a kick or the crack of a snare. What does this sound like for the sound you’re trying to make? Get a foley sound that’s similar. For instance: this could be a table bang, or a door slamming for a snare
- Tail — The end of the sound. For a snare/hat this could be white noise, or a deodorant spray style sound. For a kick, a cardboard box thud or pillow thud with a lot of processing could add some rumble
You can also take the transient, body and tail from other sounds in different packs and mix them together to create a totally different drum sound. This isn’t advised due to copyright, but many sample makers also do this.

-
For snares you can offset sounds by ms to give a more clap feel/natural feel to the sound. As you can see there are a few layers involved. The hollow crack and bottle opener are the transient; the clap is a 2nd transient nudged to the right to create a natural sound; the swipe is the tail (white noise), and the piano board thud is the body/weight of the sound. This can also be layered with the serum snare patch to make it more digital and harsh. Remeber you need the high, mid and low elements together to create a fully balanced sound.
-
For the kick the layers can also be offset by ms to add a more room-y/natural feel. The headboard thump is the thump of the kick; the serum patch is the transient and the thump; the driftwood perc provides an offset natural knock sound for more acoustic noises; and the rattle is a kind of acoustic reverb tail. This can be combined with the short reverb below to make it sound more natural (processing header).
Processing
After layering you’ll also want to process these sounds individually with EQ and change the pitch around using a frequency shifter.
Before adding processing I always use the frequency shifter to change the whole, grouped sound and even individual sounds to different tones.
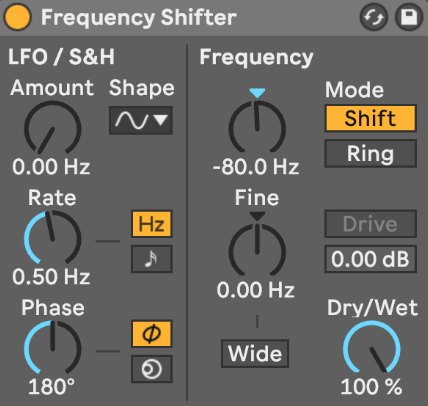
This is exceptionally useful in creating the drum tone you want as it can change the tone of something without introducing artefacts (like pitch shifting does). Moving between -120Hz to +120Hz can give you really boom-y, resonant low-end Kicks, Hats etc. all the way to high-end tonal drum sounds. It’s one of the most important tools in the tone of your drum sounds, so use it.
For the processing, I personally have an audio effect rack set up with loads of different plugin effects I can turn on or off and control from the macros in Ableton. This helps for the quick, repeatable process of creation I was talking about earlier.

Here is the processing I’ll apply after layering:
- Distortion — beef up the sound (use you ears — do you need it?)
- Saturation — beef up the sound (use you ears — do you need it?)
- Transient shaping — add more attack and punch or ease off the harshness. Maybe I want the kick to be shorter sounding — I can alter this with a transient shaper (Smack Attack is great, but there are many free transient shaping plugins available too).
- Compression - glue the entire sound together so it acts and sounds like one sound.
- Soft clipping — add more weight/smack to the one shot. I don’t always add this, but it’s on a lot of my sounds seeing as I like the heavy analog sound it provides.
- Hard clipping — for really heavy digital sounding drums that hurt. I don’t often use this, but I have it in the chain to turn off or on as I please.
- Reverb — a short 200-300ms room-style reverb to add a room-y sound for a more authentic, natural feel to the drums. This isn’t always added but is nice to have to turn off and on and play around with. I’ll also have a long tail reverb for snares etc.
- Limiting — this is used to bring the sound up to commercial volume and prevent any peaking that will cause unwanted distortion.

Once you've learnt how to make a beat pack, you can start earning from them. Sample packs make money when you sell them, either through a digital marketplace like Splice, where you'll get a royalty fee. Or, if you release your sample pack independently online, you'll get 100% of the price you name. Top producers use sample packs so don't be afraid of charging a fair fee — a good sample library is worth a lot in the recording studio.
